Iranian Handicraft
Weaving
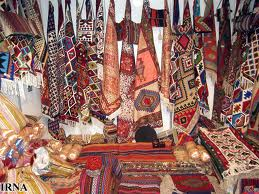
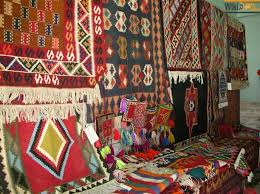
Carpet and Rug weaving
Ghalamkar
Iranian Termeh (weaving special table cloths)
Termeh is a nice cloth which is woven since Safavid era in Iran. There is an argument between researchers about its origin .Some of them believe that termeh has been made in Kashmir and then brought to Iran. Others say that Iranian have been the innovators of weaving termeh and this material has been taken in to concentration like other handicrafts in other parts of world (Kashmir: historical region divided between India and Pakistan) But it is a real fact that Iranian termeh in comparison with what ever produced in Kashmir is much better and it has different coloration and designs. The only reason that made the Kashmir famous, is using a kind of string which is produced by wild goat’s wool.Besides,the main place where it lives is Himalaya mountain range located north of India. So Kashmir termeh weaves have had more availability to it while Iranian had to use fleece. In the past, the first step in termeh weaving was preparing its raw materials. So it was very important to be careful while preparing wool, washing and drying it. Weaving termeh needs a good wool which has tall fibers. Usually the designs of iranian termeh were the result of the co-operation between two main persons- an expert and a worker. Weaving termeh was a very careful, sensitive and time consuming work that a good weaver could produce only 25 to 30 (1 feet)centimeter in a day. The background colors which are used in termeh are mostly jujube red,light red,green orange and black. Termeh as a valuable textile has many different usages and patterns such as:
Checked pattern which is like bee’s hive and is used for tablecloth.
Stripped pattern which is of two models:narrow and wide striped .
Atabaki pattern which was one of the kashmiri’s termeh used for expensive fabric because it was a finely woven termeh. Usually nobles and aristocrats used it as costly and nice cloth.
Zomorrodi pattern in which the green color was used more than the others.
Kashmiri (cashmere) in which the shape of deer’s horn was used for its design.
Termeh is a very durable cloth in which fixed colors are used so it can be washed and dried easily. Now a days termeh is mostly used for collectible tablecloth.These tablecloth are usually decorated with elaborative persian embroidery called “sermeh doozy”.
Kilims Persian embroidery (broderi dzi)
Zaridozi (decorating fabrics by sewing with golden stitches)
Metal works
Khatamkari
Minakari
Toreutics (Ghalam-Zani)[1] Wood works Moarragh Wood carving
Stone and Mosaic
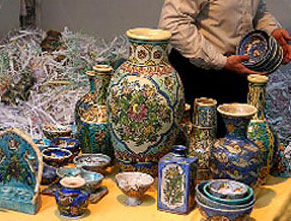
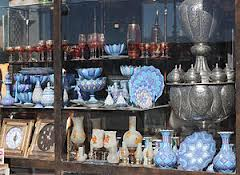
Ceramic and mosaic works
Turquoise Inlaying
Turquoise Inlaying both on jewelry and containers includes a copper, brass, silver, nickel or bronze object on parts of the surface of which small pieces of turquoise are set in mosaic fashion thus giving the object a special glamor. The production of Turquoise Inlaying includes two general stages:
A. Goldsmith Goldsmith includes the making and preparation of the object intended for Turquoise Inlaying using one of the metals indicated above. This is done by a goldsmith or forger using hands, press machine or both. After the object is formed generally, be it a piece of jewelry or a container, the part to be turquoise inlaid is demarked and a thin metal strand (of the same material as the metal used in the fabrication of the object) called “kandan” is placed around and soldered onto it. This part around the intended form is a so-called wall standing two or three millimeters above the surface of the container. This is usually done by or sometimes the turquoise inlayer himself. If the part prepared for Turquoise Inlaying takes up too much of the surface with an empty looking background, strands of the same metal are used to place smaller patterns of decorative nature (such as flowers, bushes, etc.) inside it and soldered again. This both makes the work more beautiful and makes the turquoise inlaid surface stronger.
B. Turquoise Inlaying First of all, the turquoise inlayer buys waste turquoise chips from turquoise forming workshops or turquoise mines in Mashhad, Neishabour or Damghan. Since such turquoise chips are usually accompanied by some earth and ordinary stone chips, they are first separated and cleaned. Then, the turquoise chips are graded based on their sizes so the right size turquoise chips are used in making each Turquoise Inlaying object in proportion to the surface area. In the next step, the object is heated (to about 30oC) and, while heating, a “walnut lac” is sprinkled onto the parts that have to be turquoise laid so that the lac powder is almost melted and covers the intended surface. While the lac is still soft and sticky on the object surface, some of the turquoise chips that were prepared before based on their size are place on the work surface. The chips must be placed in a way so that no space is left between them as far as possible. In order to fill the possible gaps between turquoise chips, temperature is added (to about 40oC) and some more lac powder is sprinkled onto the chips until the lac layer is softened to a melting form, and then try to fill all the spaces by adding smaller turquoise chips, or, as they say, the chips sit well on the surface. This is usually done by pressing the turquoise chips by hand onto the surface so that they stick fast to it. After the object is cooled, the lac covered parts become rigid. After that stage, the parts covered by lac and turquoise chips are polished with emery so the extra lac and little raised parts of the chips are flattened. That is the stage where the color of the turquoise chips becomes visible as turquoise and that of lac as black (or dark brown) in the spaces between the chips. After this stage is completed, if there is still some fallouts in some parts of the work, the object is heated again, and the empty parts are restored with small turquoise chips and lac. Then, the surface is polished and honed again. The restoration is sometimes done with a type of turquoise colored putty that is prepared with “mol” mud, oil and lapis paint. The final stage of Turquoise Inlaying is burnishing which is done in two stages itself. The first stage consists of burnishing the metal parts which is done at a goldsmith or machining workshop where the opaque layer that is formed on the metal parts during Turquoise Inlaying is removed with hand tools or a machine blade, and then, those parts are polished so the metal becomes shiny. The second stage consists of burnishing the turquoise inlaid product. After polishing the metal parts of the object, the work is returned to the turquoise inlayer’s workshop where the turquoise inlaid surface is polished with olive or sesame oil so that part becomes shiny, too. A Turquois Inlaying craftsman employs different tools and devices for different stages of the job mostly including dies, hammers, drills, natural gas and gasoline torches, pincers, pliers, forceps, different metal pipes tweezers, files and emeries. The most important point in Turquoise Inlaying is correct installation of turquoise chips on the metal so that it is strong enough and the chips do not come off while burnishing the work. The other important point is that a piece of turquoise inlaid work will be of more artistic value if the turquoise chips are installed more regularly in close contact, i.e. without a space in between.
Weaving
Carpet and Rug weaving
Ghalamkar
Iranian Termeh (weaving special table cloths)
Termeh is a nice cloth which is woven since Safavid era in Iran. There is an argument between researchers about its origin .Some of them believe that termeh has been made in Kashmir and then brought to Iran. Others say that Iranian have been the innovators of weaving termeh and this material has been taken in to concentration like other handicrafts in other parts of world (Kashmir: historical region divided between India and Pakistan) But it is a real fact that Iranian termeh in comparison with what ever produced in Kashmir is much better and it has different coloration and designs. The only reason that made the Kashmir famous, is using a kind of string which is produced by wild goat’s wool.Besides,the main place where it lives is Himalaya mountain range located north of India. So Kashmir termeh weaves have had more availability to it while Iranian had to use fleece. In the past, the first step in termeh weaving was preparing its raw materials. So it was very important to be careful while preparing wool, washing and drying it. Weaving termeh needs a good wool which has tall fibers. Usually the designs of iranian termeh were the result of the co-operation between two main persons- an expert and a worker. Weaving termeh was a very careful, sensitive and time consuming work that a good weaver could produce only 25 to 30 (1 feet)centimeter in a day. The background colors which are used in termeh are mostly jujube red,light red,green orange and black. Termeh as a valuable textile has many different usages and patterns such as:
Checked pattern which is like bee’s hive and is used for tablecloth.
Stripped pattern which is of two models:narrow and wide striped .
Atabaki pattern which was one of the kashmiri’s termeh used for expensive fabric because it was a finely woven termeh. Usually nobles and aristocrats used it as costly and nice cloth.
Zomorrodi pattern in which the green color was used more than the others.
Kashmiri (cashmere) in which the shape of deer’s horn was used for its design.
Termeh is a very durable cloth in which fixed colors are used so it can be washed and dried easily. Now a days termeh is mostly used for collectible tablecloth.These tablecloth are usually decorated with elaborative persian embroidery called “sermeh doozy”.
Kilims Persian embroidery (broderi dzi)
Zaridozi (decorating fabrics by sewing with golden stitches)
Metal works
Khatamkari
Minakari
Toreutics (Ghalam-Zani)[1] Wood works Moarragh Wood carving
Stone and Mosaic
Ceramic and mosaic works
Turquoise Inlaying
Turquoise Inlaying both on jewelry and containers includes a copper, brass, silver, nickel or bronze object on parts of the surface of which small pieces of turquoise are set in mosaic fashion thus giving the object a special glamor. The production of Turquoise Inlaying includes two general stages:
A. Goldsmith Goldsmith includes the making and preparation of the object intended for Turquoise Inlaying using one of the metals indicated above. This is done by a goldsmith or forger using hands, press machine or both. After the object is formed generally, be it a piece of jewelry or a container, the part to be turquoise inlaid is demarked and a thin metal strand (of the same material as the metal used in the fabrication of the object) called “kandan” is placed around and soldered onto it. This part around the intended form is a so-called wall standing two or three millimeters above the surface of the container. This is usually done by or sometimes the turquoise inlayer himself. If the part prepared for Turquoise Inlaying takes up too much of the surface with an empty looking background, strands of the same metal are used to place smaller patterns of decorative nature (such as flowers, bushes, etc.) inside it and soldered again. This both makes the work more beautiful and makes the turquoise inlaid surface stronger.
B. Turquoise Inlaying First of all, the turquoise inlayer buys waste turquoise chips from turquoise forming workshops or turquoise mines in Mashhad, Neishabour or Damghan. Since such turquoise chips are usually accompanied by some earth and ordinary stone chips, they are first separated and cleaned. Then, the turquoise chips are graded based on their sizes so the right size turquoise chips are used in making each Turquoise Inlaying object in proportion to the surface area. In the next step, the object is heated (to about 30oC) and, while heating, a “walnut lac” is sprinkled onto the parts that have to be turquoise laid so that the lac powder is almost melted and covers the intended surface. While the lac is still soft and sticky on the object surface, some of the turquoise chips that were prepared before based on their size are place on the work surface. The chips must be placed in a way so that no space is left between them as far as possible. In order to fill the possible gaps between turquoise chips, temperature is added (to about 40oC) and some more lac powder is sprinkled onto the chips until the lac layer is softened to a melting form, and then try to fill all the spaces by adding smaller turquoise chips, or, as they say, the chips sit well on the surface. This is usually done by pressing the turquoise chips by hand onto the surface so that they stick fast to it. After the object is cooled, the lac covered parts become rigid. After that stage, the parts covered by lac and turquoise chips are polished with emery so the extra lac and little raised parts of the chips are flattened. That is the stage where the color of the turquoise chips becomes visible as turquoise and that of lac as black (or dark brown) in the spaces between the chips. After this stage is completed, if there is still some fallouts in some parts of the work, the object is heated again, and the empty parts are restored with small turquoise chips and lac. Then, the surface is polished and honed again. The restoration is sometimes done with a type of turquoise colored putty that is prepared with “mol” mud, oil and lapis paint. The final stage of Turquoise Inlaying is burnishing which is done in two stages itself. The first stage consists of burnishing the metal parts which is done at a goldsmith or machining workshop where the opaque layer that is formed on the metal parts during Turquoise Inlaying is removed with hand tools or a machine blade, and then, those parts are polished so the metal becomes shiny. The second stage consists of burnishing the turquoise inlaid product. After polishing the metal parts of the object, the work is returned to the turquoise inlayer’s workshop where the turquoise inlaid surface is polished with olive or sesame oil so that part becomes shiny, too. A Turquois Inlaying craftsman employs different tools and devices for different stages of the job mostly including dies, hammers, drills, natural gas and gasoline torches, pincers, pliers, forceps, different metal pipes tweezers, files and emeries. The most important point in Turquoise Inlaying is correct installation of turquoise chips on the metal so that it is strong enough and the chips do not come off while burnishing the work. The other important point is that a piece of turquoise inlaid work will be of more artistic value if the turquoise chips are installed more regularly in close contact, i.e. without a space in between.